Guided Facility Setup#
The /osprey:setup skill is OSPREY’s guided setup: a conversation with a
coding agent you bring — Claude Code in the commands below. That agent is not the
OSPREY agent: the setup builds the deployment the OSPREY agent later runs
from. It starts from what you already have, installs OSPREY if it is missing,
agrees each step with you, and ends on a deployment repository for your
accelerator, beamline, or detector that validates and builds. You can stop and
resume at any point.
Prerequisites
A coding-agent CLI — the setup runs inside a coding-agent session; the commands here use Claude Code. Install the pinned version as Step 2 of Installation shows, and make sure
claude --versionworks in your terminal.uv — the setup puts OSPREY on your
PATHwithuv tool install. Installation covers installinguv; OSPREY itself can wait for the conversation.A provider API key — the setup is a live conversation with an AI service, usually whichever one your lab provides.
Recommended: a container runtime (Docker or Podman) so that
osprey upworks on the result, and a list of your channel names if you have one.
Install the skill#
The skill ships in the osprey plugin:
claude plugin marketplace add als-apg/osprey --sparse .claude-plugin plugins
claude plugin install osprey@osprey
How to update the plugin or run it from a checkout is on Agent Skills.
Run it#
mkdir -p ~/my-osprey-project
cd ~/my-osprey-project
claude
In the agent session, type:
/osprey:setup
What happens#
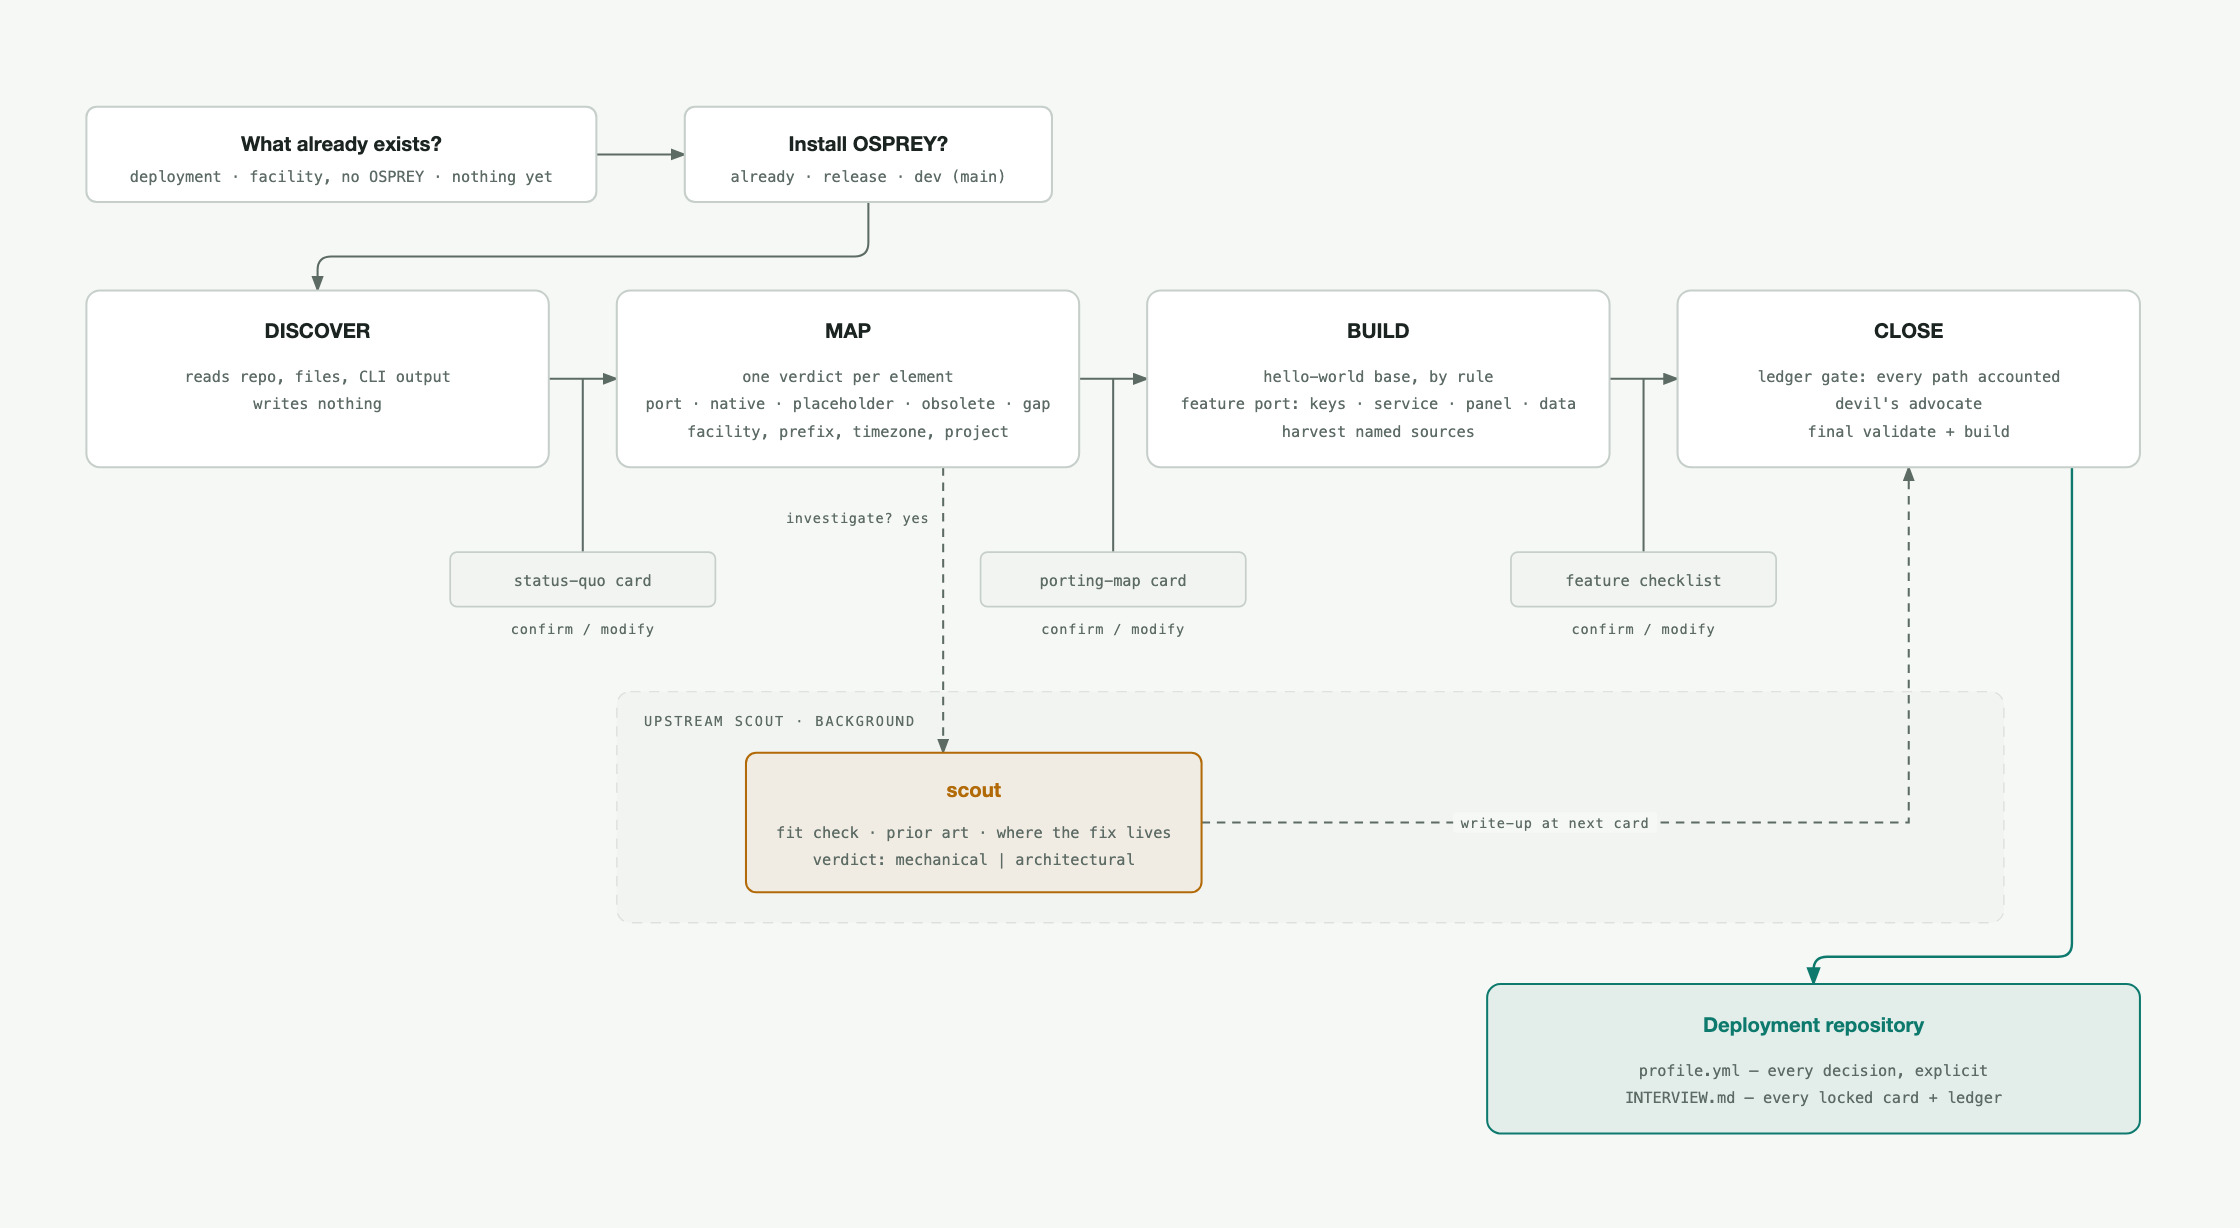
Two questions, four phases, a card to confirm at the end of each. The upstream scout runs beside the conversation, not in it.#
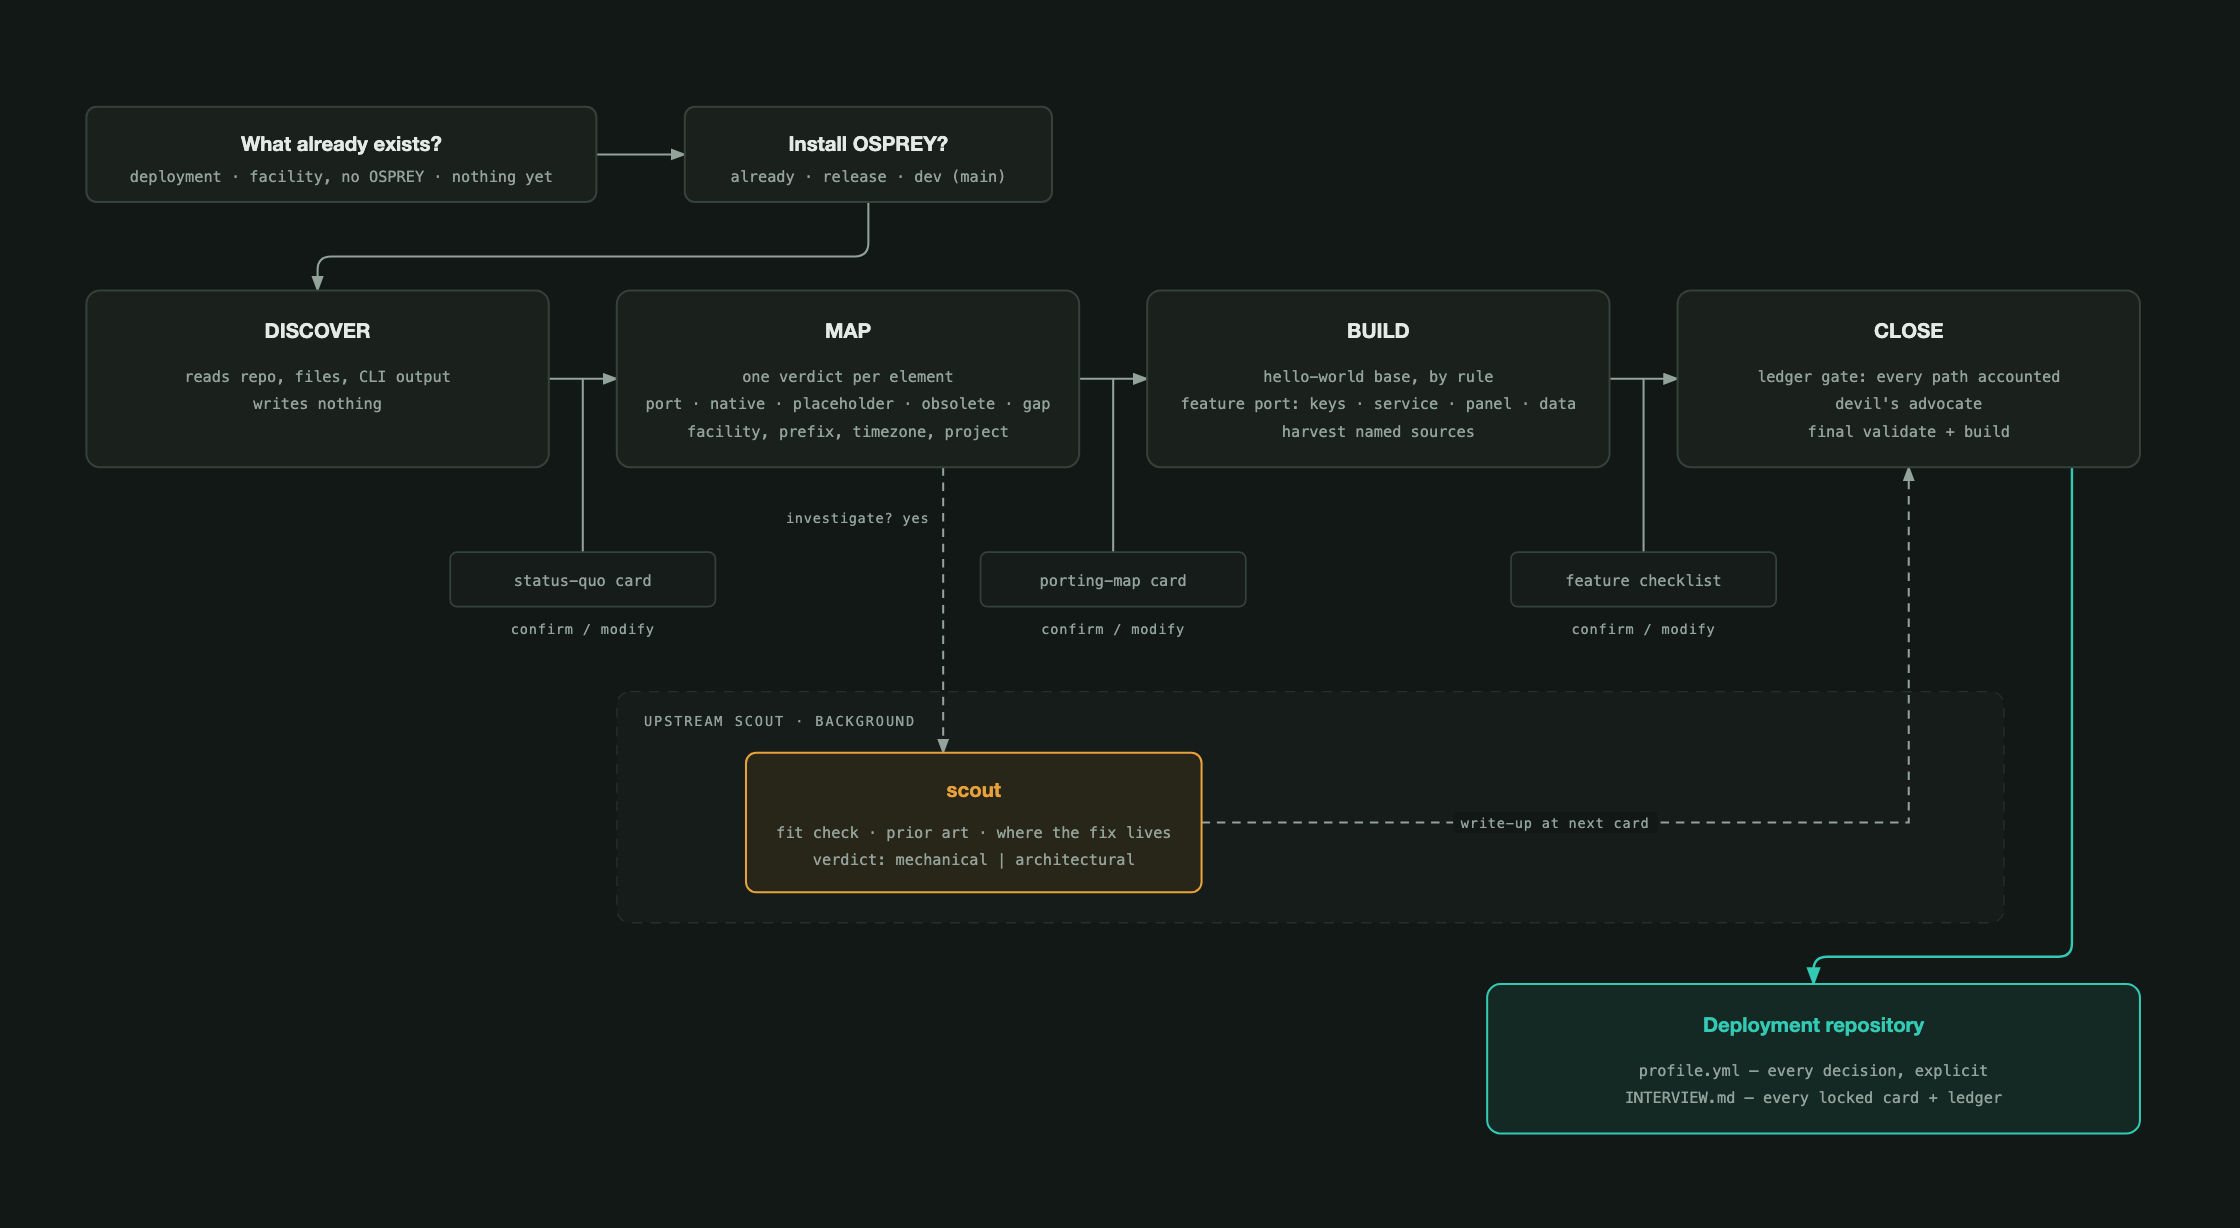
Two questions, four phases, a card to confirm at the end of each. The upstream scout runs beside the conversation, not in it.#
It opens with two questions: what already exists (an OSPREY deployment, a facility
without one, or nothing yet), and whether OSPREY is installed on this machine. If it
is not, you choose the latest release or the development version from main, and
the setup installs it for you.
Then four phases, each ending on a card and one question: confirm, or say what should
change. A confirmed card is written into INTERVIEW.md and is not reopened.
DISCOVER reads your repository, files and command output, writes nothing, and shows a status-quo card: what is there now, grouped into boxes. Anything that still describes OSPREY’s reference facility rather than yours is marked as such.
MAP gives every element one verdict: carry it over, use what OSPREY has, replace a reference-facility placeholder with your own, drop it, or flag a gap OSPREY cannot express. Then it asks for the facility name, timezone and project name.
BUILD creates the project from the hello-world preset and shows a feature
checklist: every optional feature of the full reference example, recommended on
whenever your facility has the source it consumes. A logbook means the ARIEL logbook
search is recommended on, with your logbook ingested. Documentation, an IOC database or
a channel list mean the knowledge bundle, the facility graph and the graph channel
finder are recommended on, seeded from those sources when you say so. A MATLAB Middle
Layer export is the one source that carries the channels and the graph at once: the
setup reads it in with osprey facility import mml, has you review what each
device family means, and osprey build writes the channel database and the facility
graph from that one review (Import a Middle Layer export). An export that also
carries its simulator model gives you a virtual accelerator besides: the same review
says which families the model drives, and the deployment can serve your own channel
names against your own lattice before it is ever pointed at the machine
(Use the Virtual Accelerator). Each adopted feature enters
the profile through the same fixed sequence, and every file that lands gets a row in a
provenance ledger.
CLOSE checks the ledger against the file tree and blocks until every path names your facility, a skeleton, or a reason; then a second agent argues against the setup; then a final validate and build.
When the conversation hits something OSPREY cannot express for your facility, the setup offers to investigate it in the background while you continue. The result comes back as a write-up with a verdict, mechanical or architectural, and a recommendation: fix it on a branch and build your deployment against that branch, or file an issue with the OSPREY team. Nothing is sent without you seeing it.
To resume, open the repository and run /osprey:setup again. It continues
after the last confirmed card.
Migrating an existing project is the same conversation. Answer “an OSPREY
deployment already exists” and DISCOVER inventories it, whatever its generation.
The porting map is your migration plan. Files that carry over are copied
unchanged, and custom code that needs real work is recorded in INTERVIEW.md
as work to do rather than attempted mid-conversation.
Tips#
If you’re not sure about a question, say “I’m not sure”. It picks a safe default and records that it did.
Ask to see the assistant running whenever you’re curious. You can ask for a build at any pause.
Build and run#
The setup leaves you inside the deployment repository it built:
osprey build     # render build/ from the profile
osprey web       # web dashboard on your own machine
Or talk to the agent directly with osprey chat. Adjust anything later by
editing profile.yml (every key carries its own explanation) and running
osprey build again.
Deploy it#
Deployment coordinates go in the profile under a deploy: block: the CI
platform, the deploy host, and the container registry if that host pulls its
images. A fresh profile ships this block commented out. Credentials are named
there, never written there. Then:
osprey scaffold ci    # CI pipeline + post-deploy health check script
osprey up -d          # start it
osprey status         # what is running, where it answers, which build it is
See Deploy a Facility for a worked example from an empty directory to running containers, and Build Profiles for the full build profile reference.