Multi-User Support#
The multi-user Web Terminal turns one OSPREY project into a small shared
product: a landing page where each member of your team picks their name, and a
private, containerized Web Terminal behind each card — all served from a single
host, brought up with a single osprey up.
What You’ll Learn
How it sits beside the single-user
osprey webworkflow, and when each mode is the right toolThe three ideas behind the multi-user stack: one container per user, personas as capability tiers, and one nginx front door
The
modules.web_terminalsconfig block that switches it onStanding the two-persona stack up from the
control-assistantpreset, and watching the write boundary refuse — and approve — a real writeDay-to-day operations: adding, reseeding, and removing users
How to require a login — passwords OSPREY manages, or your facility’s single sign-on
Prerequisites: The concepts need none. To stand the stack up you’ll
want Docker (or Podman) and your model-provider credentials — the
control-assistant preset ships the whole block pre-wired.
Single-user is the front door#
The everyday workflow stands on its own. From any project directory,
osprey web
launches the single-user Web Terminal as one local process — no containers, no
proxy, ready in seconds at http://127.0.0.1:8087. It is the fastest way to
try OSPREY and the right tool whenever one person sits in front of one machine;
Run the Web Terminal covers it.
The multi-user stack is strictly opt-in. It lives in a
modules.web_terminals block in the deployment’s built config.yml, read
only by the lifecycle verbs (and validated by
osprey scaffold web-terminals lint).
osprey web never looks at it — so a project that carries the block (the
control-assistant preset ships one) runs single-user exactly like one that
does not. Reach for the multi-user stack when several people need their own
terminal on a shared machine, and stay with osprey web for everything else.
How it works#
        flowchart LR
    B[Browser] -->|:9080| N[nginx landing page]
    N -->|/u/alice/| A[alice's terminal container]
    N -->|/u/bob/| Bo[bob's terminal container]
    A --- S[(shared services:<br/>databases · telemetry)]
    Bo --- S
Three ideas carry the whole design:
One container per user. Every name on the roster gets its own Web Terminal
container, plus two named volumes that belong to the user, not the container:
a workspace volume (the files the agent reads and writes) and an
agent-configuration volume. Upgrading or rebuilding an image replaces the
container but never touches those volumes, so a user’s files and settings
survive every redeploy. On first start, osprey up seeds each user’s
configuration volume automatically — no per-user setup steps.
A persona is a capability tier — and a whole project. Users map to
personas, and each persona is its own rendered OSPREY project with its own
config.yml, permissions, skills, and tool servers. Because permissions are
a property of a project, the tiers are genuinely different agents — not one
agent with a UI toggle. The control-assistant preset ships two: a
read-only tier and a read-write tier — the same agent and tool surface,
differing on exactly one config key (control_system.writes_enabled).
osprey build renders one persona project per delta in personas/, and
osprey up builds each one’s container image locally, so no registry or CI is
involved.
One front door. An nginx reverse proxy serves the landing page and proxies
/u/<name>/ to that user’s container. The per-user containers are pinned to
the loopback interface, so nginx is the only network path in. The landing page
lists the roster, and its cards are how someone picks an identity; whether
clicking a card lets them in depends on whether you have turned login on —
see Require a login.
The config block#
The whole feature is one config block. This is what a project built from
the control-assistant preset carries in its config.yml:
modules:
  web_terminals:
    enabled: true
    image_source: local       # osprey up builds persona images itself
    nginx_port: 9080          # the landing page
    web_base_port: 9091       # per-user ports: base + user index
    artifact_base_port: 9291
    ariel_base_port: 9391
    lattice_base_port: 9491
    channel_finder_base_port: 9591
    default_persona: readonly
    users:
    - name: alice
      index: 0
      persona: readwrite
      display_name: "Control Room (Alice)"
    - name: bob
      index: 1
      persona: readonly
      display_name: "Read-Only View (Bob)"
    personas:
      readonly:
        project: control-assistant-readonly
        project_path: build/control-assistant-readonly
        build_profile: personas/readonly.yml
      readwrite:
        project: control-assistant-readwrite
        project_path: build/control-assistant-readwrite
        build_profile: personas/readwrite.yml
Each build_profile names that persona’s delta in the deployment
repository — the file osprey init writes under personas/ and
points the catalog at. The delta merges over profile.yml, so every
persona shares one data
tree, one set of secrets, and one set of your own artifacts. A bundled
preset name, an absolute path, or a path outside personas/ is
rejected by both osprey scaffold web-terminals lint and
osprey up.
The users list is the roster — the single source of truth for who
exists. A bare name (- carol) resolves to default_persona —
read-only, so a hastily added user lands on the safe side; an entry with
an explicit persona picks its tier, and an optional display_name
becomes that user’s browser tab title. Each user’s host ports are
base + index in every port family — one family per companion panel
(artifact gallery, ARIEL, channel finder, lattice dashboard, …) plus the
terminal itself — so alice (index 0) serves her terminal on 9091 and
bob (index 1) on 9092. A panel whose *_base_port you don’t set
falls back to its built-in default, so the block above lists them only
to make the layout visible.
Tip
Give every roster entry an explicit index before you ever
remove one. Once indices are pinned, deleting an earlier user can
no longer shift a later user’s ports out from under a running
deployment.
The roster drives everything: edit it, then let the lifecycle verbs reconcile reality against it.
Edit it in the source profile — the modules.web_terminals.users
entry under config: in profile.yml — and rebuild. A roster change
made directly in the built build/config.yml deploys, but the next
build overwrites it. Rebuilding also seeds an empty
web-terminal-context/<user>/ slot for each new operator, which is
where their per-user context goes.
Task |
Command |
|---|---|
Add a user |
Add a roster entry with the next free |
Reseed workspaces |
|
Remove one user |
|
Clean up leftovers |
|
Tear it all down |
|
osprey status and osprey down work exactly as they
do for any other OSPREY service stack.
Run the two-persona stack#
From a fresh checkout, create a deployment repository from the bundled preset, then build and bring the stack up from inside it:
# 1. Create the deployment repo from the control-assistant preset
osprey init control-assistant --preset control-assistant

# 2. From inside the repo, render it and bring the whole stack up
cd control-assistant
osprey build
osprey up
That is the entire setup: the preset ships the modules.web_terminals block
above, so no extra flags or configuration are needed. Alongside the web tier,
osprey up brings up everything else the control-assistant tutorial deploys
— the virtual accelerator, the scan services, and the supporting
PostgreSQL/OpenObserve containers — so the two personas open onto a working
control room, not an empty shell.
Note
The personas’ agent needs your provider credentials at run time. Add them
to the repository’s .env before osprey up (the preset defaults
to Anthropic — set ANTHROPIC_API_KEY). If you chose a different provider
(osprey set provider=...), that choice is recorded in profile.yml and
carried into every persona project the build renders.
Note
Running from a source checkout of the OSPREY repository rather than a
released install? Add --dev to osprey up. The images install
the framework from PyPI by default, and a source tree’s version isn’t
published there; --dev bakes your local checkout into the images
instead.
What osprey build and osprey up do for the web tier#
The build renders the two persona projects.
osprey buildrenders one project per delta inpersonas/, into the build zone beside the main render (build/control-assistant-readonlyandbuild/control-assistant-readwrite). Because each delta merges overprofile.yml, both personas share its data tree, secrets and artifacts, and inherit the choices recorded there (provider, model): edit the profile once and both terminals pick the change up from the file rather than from a replayed command line. A start renders none of this —build/is the whole account of what will run — so a persona project missing at start time is reported as a stale or partial build, with a rebuild as the remedy.The start builds each persona’s image. In the preset’s local mode (
image_source: local),osprey upbuilds each persona’s image (tagged<project>-<persona>:local) from that rendered project — no registry, no CI.Brings up the web tier. An nginx reverse proxy (container
ca-nginx) serves the landing page onhttp://127.0.0.1:9080, and one Web Terminal container comes up per user —ca-web-aliceon host port9091andca-web-bobon9092— each reached through the landing page. (Theca-prefix is the preset’sfacility.prefix; change it for your site.)
Stop the stack again with osprey down; check on it with
osprey status.
Note
The web stack runs with host networking. On Linux,
http://127.0.0.1:9080 is reachable as-is. On macOS, a container’s
“host” is Docker Desktop’s Linux VM — enable host networking in Docker
Desktop (Settings → Resources → Network) so the stack’s ports reach your
browser.
If another OSPREY deployment already occupies a service port on this host,
change it in the profile and rebuild — for example
osprey set config.services.postgresql.port_host=5433 && osprey build —
before osprey up.
The landing page#
Open http://127.0.0.1:9080. The landing page groups the users into cards,
each labelled with the persona it resolves to:
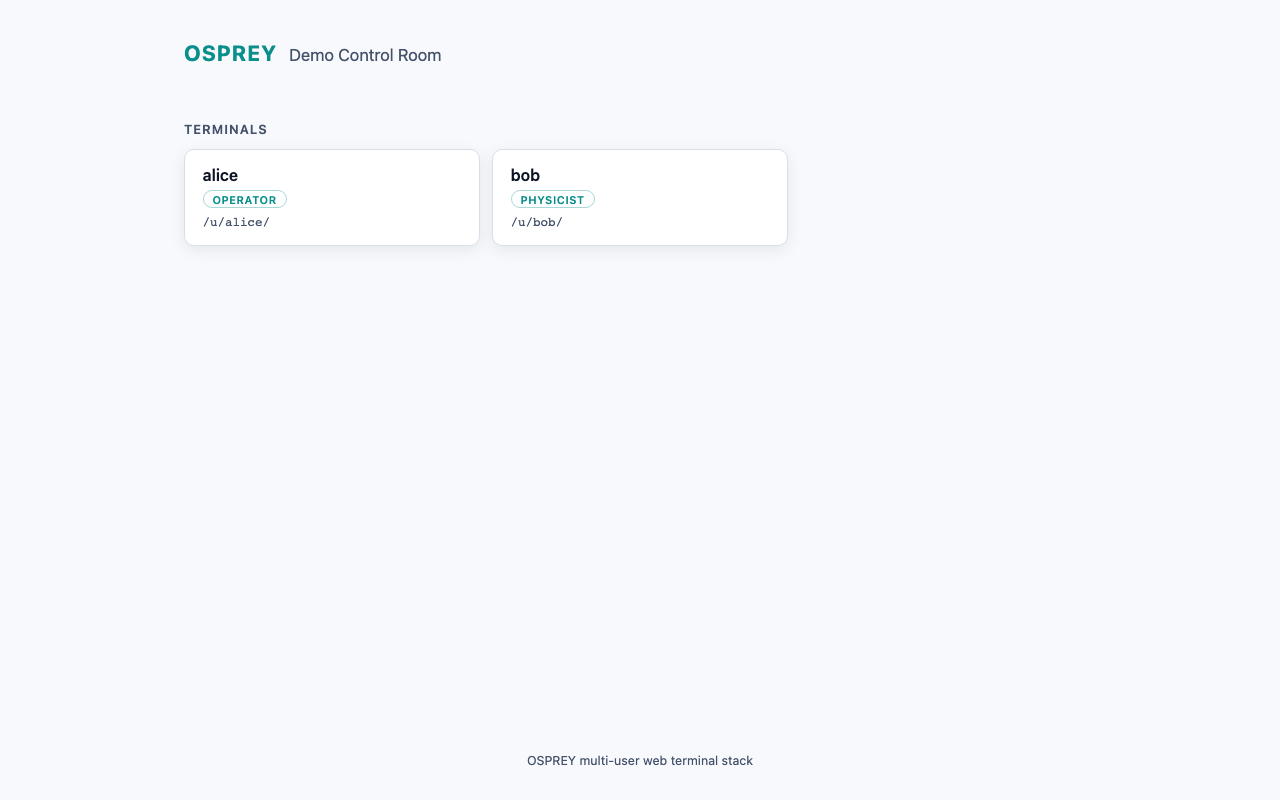
The grouped landing page: alice resolves to the readwrite persona, bob to readonly. Click a card to open that user’s session.#
Both entries name their persona explicitly — alice the readwrite tier, bob the
readonly one. (A bare roster entry would fall back to the preset’s
default_persona, readonly, so an implicit user always lands on the safe
side.) Clicking a card opens that user’s terminal at /u/<name>/, proxied
by nginx to the user’s own container.
Two sessions, two write postures#
Each persona is a self-contained OSPREY project with its own permissions,
because permissions are a property of a project’s config.yml — the two
tiers are genuinely different agents, not one agent with a UI toggle. The
enforcement boundary is exactly one config key, the reference monitor’s
master write switch; the tiers additionally differ in presentation — the
write-armed terminal gets the full expert workspace with the EVENTS and
BLUESKY control panels, the read-only one a chat-first simple surface without
them:
User |
|
What that means in the session |
|---|---|---|
alice |
|
Write-capable — and supervised, not unguarded. A channel write still passes the writes-check hook, per-channel min/max limits, and a human approval prompt before the connector executes it. |
bob |
|
Read-only. Channel reads, the channel finder, the archiver, and logbook search all work — but every write surface refuses: channel writes, read-write Python execution, all of it, from the single switch. |
The posture is a property of the session, not a statement about the person: which teammates get a write-capable tier is your roster’s call, and the point is that the framework provisions genuinely different postures from one deployment.
The boundary is enforced, not asserted — so you can watch it act. Open each user’s terminal and ask both agents to do the same two things:
Read. Ask either agent about a channel — a corrector setpoint, a BPM reading. Both sessions answer identically: reads are ungated on both tiers.
Write. Ask each agent to change a setpoint. In alice’s session the write goes to a human approval prompt, then executes. In bob’s session the same request is refused: the write tool is denied in his project’s rendered permissions, and the refusal states plainly that writes are disabled in his configuration.
Both agents carry the same tool surface — the readonly tier is not a stripped-down agent that never heard of writing. It is the same agent whose write path is switched off in its own project, which is exactly what you want to demonstrate to a control room: the boundary holds at the enforcement layer, not at the menu. (The readonly terminal’s leaner look — no EVENTS/BLUESKY tabs, chat-first layout — is presentation for the viewer tier, not the boundary itself: the refusal above fires with or without it.)
Logging out and switching users#
Every session’s header carries a chip naming the signed-in user; clicking it opens a small menu with Log out. That POSTs to the terminal’s logout route, clears the local session pointer, and returns you to the landing page. From there, pick another card to open a different user. Logging out ends the session for real — the terminal drops its running processes, so the next login starts fresh. Simply navigating away (without logout) keeps the session warm, and returning to the same user reconnects to it.
Require a login#
Out of the box the stack asks for no credentials and speaks plain HTTP:
clicking a card on the landing page opens that terminal, and anyone who can
reach the nginx port can click any card. That posture suits a single trusted
host — a workstation or control-room machine you already trust — and nothing
beyond it. It is the walkthrough’s choice, not a limit of the stack: it keeps
one osprey up on a laptop free of certificates and identity
providers. No preset ships with login enabled, so this is something you turn on
deliberately.
Set auth.method and every request under /u/<name>/ — pages, APIs and
the terminal’s live connection alike — is refused unless the browser holds a
valid session for that user. The check happens at the front door: a small
authentication service joins the stack in its own container, and nginx asks it
about each request before proxying anything. Nothing depends on the per-user
containers policing themselves.
Note that the persona split is a capability boundary, enforced per project — it decides what a session may do, never who may open it. Those are separate questions, and login answers only the second.
Choose a method#
Passwords, managed by OSPREY. Nothing extra to run or operate:
modules:
  web_terminals:
    tls:
      enabled: true
      host_cert_dir: /etc/ssl/facility     # host side; mounted for you
      cert: /etc/osprey/tls/facility.crt   # container side
      key: /etc/osprey/tls/facility.key
    auth:
      method: password
OIDC, against the single sign-on your facility already runs. Each roster entry names the identity that maps to it, so a valid login as somebody else cannot open this user’s terminal:
modules:
  web_terminals:
    tls:
      enabled: true
      host_cert_dir: /etc/ssl/facility     # host side; mounted for you
      cert: /etc/osprey/tls/facility.crt   # container side
      key: /etc/osprey/tls/facility.key
    auth:
      method: oidc
      oidc:
        issuer: https://sso.example.org/realms/accelerator
        client_id_env: OSPREY_AUTH_OIDC_CLIENT_ID
        client_secret_env: OSPREY_AUTH_OIDC_CLIENT_SECRET
        claim: sub                       # ID-token claim to match on
    users:
      - name: alice
        index: 0
        oidc_subject: "8f4c1e02-..."     # alice's value of that claim
      - name: bob
        index: 1
        oidc_subject: "b7d9a340-..."
The *_env keys hold environment-variable names, not credentials: put the
client id and secret in the project’s .env.auth under those names — that is
the only file the authentication service reads credentials from. The names
shown are the ones OSPREY reads when you omit the keys, and claim falls back
to sub in the authentication service itself. oidc_subject is not a
secret — it is the identifier your provider already publishes for that person.
Warning
No secret may contain a dollar sign — not in .env.auth, and not in
the .env and .env.production that carry your provider API key and
facility passwords. Depending on which container stack reads these files,
$ sequences inside the values are substituted on the way through —
with Docker Compose, secret$abc arrives as secret and P@$$w0rd
arrives as P@$w0rd; other stacks mangle a different set. Either way the
file on disk still reads correctly, so the only symptom is a login or a
token exchange that refuses for no visible reason.
This bites hardest with a client secret your identity provider generated for
you, since you did not choose those characters. If yours contains a $,
issue a new one rather than trying to escape it — escaping is not portable
between container runtimes, so there is no spelling that works everywhere.
osprey up refuses to start a stack whose secrets would be corrupted
this way and names the offending variables, so you find out before the
deployment is running rather than after someone cannot log in.
The same rule extends to each user’s oidc_subject, which travels a
different route (the rendered compose file rather than an env file) but is
rewritten the same way: lint refuses a subject containing $ and names
the user. If your provider genuinely issues one, map a different claim via
auth.oidc.claim.
Three more keys are optional. auth.port is the port the authentication
service listens on (default 9070); auth.session_lifetime is how long a
session stays valid, in whole seconds (default 43200, twelve hours); and
auth.image names the service’s image, which is required when
image_source: registry — your CI publishes that image the same way it
publishes the terminal images. In image_source: local mode
osprey up builds it for you and auth.image is not needed.
Warning
auth.port and auth.session_lifetime must be plain positive integers.
A duration string like "12h", a decimal, zero or a negative number is
silently replaced by the default — nothing warns you — so a deployment
that meant eight-hour sessions would quietly keep twelve-hour ones.
The service listens on 127.0.0.1 on the deploy host itself (the web stack
uses host networking), so nginx reaches it and nothing off-host does. It is not
published as a container port, and anyone with a shell on the deploy host can
reach it — the same as every per-user terminal.
Serve it over HTTPS#
A session cookie sent over plain HTTP is readable by anything on the path, so a
deployment with auth.method other than none and tls.enabled: false
refuses to render at all rather than hand out cookies in the clear. You
therefore have to pick one of two ways to get the connection encrypted.
Let this nginx terminate TLS. Set tls.enabled: true with a certificate
and key, and nginx serves HTTPS on 443, redirects the plain port to it, and
marks session cookies so browsers only ever send them over HTTPS. Bringing the
certificate is still your job, but getting it into the container is not:
tls:
  enabled: true
  host_cert_dir: /etc/ssl/facility          # on the deploy host
  cert: /etc/osprey/tls/facility.crt        # inside the container
  key: /etc/osprey/tls/facility.key
host_cert_dir is the only key here that names a path on the deploy host;
cert and key are paths inside the nginx container. Setting
host_cert_dir bind-mounts that directory, read-only, at the directory
cert sits in — so the certificate is where nginx looks without you writing
any compose of your own. Renewals need nothing extra: the mount is a directory,
so a replaced file is picked up on the next nginx reload.
Because one mount has to deliver both files, cert and key must sit in
the same directory, and host_cert_dir must be absolute. A deployment that
breaks either rule is refused at render time, naming the reason — rather than
starting an nginx that immediately dies looking for a file nobody mounted.
Note
host_cert_dir is optional. Leave it out and nothing is mounted: the
compose overlay renders exactly as it does without TLS, and supplying the
certificate is yours to arrange — a bind mount from a small compose file of
your own, listed after the web overlay in runtime.compose_files, or
whatever your facility’s certificate management already does. That is the
route to take when a plain directory bind cannot express how certificates
reach this host.
Or terminate TLS in front of this nginx. If a facility load balancer or
ingress proxy already presents the certificate and forwards to this host, set
auth.allow_insecure_http: true and leave tls.enabled off. This is a
normal deployment, not a workaround: the browser’s connection is encrypted by
the thing in front, and the hop it forwards over is yours to keep private.
What allow_insecure_http is not is a way to postpone certificates on a
reachable host. With it set and nothing terminating TLS, anyone who can watch
the traffic can copy a session cookie and become that user. An isolated network
where you accept that risk is the only other case for it.
Passwords, and where they live#
In password mode osprey up makes sure every user on the roster has a
password hash before it starts anything, and aborts before a single container
starts if it cannot — an unwritable file is caught here rather than becoming a
stack nobody can log in to. The same check covers the keys used to sign session
cookies, so an OIDC deployment can abort the same way even though it provisions
no passwords at all. The usual cause either way is permissions on .env.auth
or on the project directory.
The hashes and signing keys live in .env.auth in the project root — mode
0600, listed in the generated .gitignore next to .env.production,
and handed to the authentication service alone. No terminal container ever sees
it.
For each user, in order:
An existing hash in
.env.authis kept. Deploying again never resets anyone’s password.Otherwise, a plaintext
OSPREY_AUTH_PW_<USER>in the project’s.envis hashed into.env.auth— the way to set a password you already chose. The plaintext stays on the deploy host; only the hash reaches a container.Otherwise a password is generated, hashed, and printed once, on that deploy’s output. Nothing can recover it afterwards, so capture it and hand it to the person.
<USER> is the username uppercased with - turned into _. Because that
mapping is what keeps one user’s password out of another user’s terminal, an
authenticated deployment refuses to render when two roster names collide under
it (alice-b and alice_b), or when a name falls outside
[a-z0-9][a-z0-9_-]*.
To change a password later:
osprey users passwd alice
It prompts (never echoing), rewrites that one hash, and restarts the authentication service. Alice’s existing sessions stop working immediately, and nobody else’s are touched.
Sessions, logging out, and rolling back#
The landing page stays public — it lists the roster so people can find their own card, and a card is a prompt, not a door. One browser may hold several unlocked users at once, which is what a shared control-room machine needs; logging out ends that one user’s session and leaves the others alone.
Note
The list of logged-out sessions is held in the authentication service’s
memory, so restarting that container forgets it. A cookie captured before a
logout could be replayed until it expires on its own — within
auth.session_lifetime.
Removing someone needs care, because a credential can outlive the person’s account in three different ways:
Use osprey users remove alice , not a hand-edit. Deleting a
roster entry and running osprey up removes alice’s container, and the
authentication service stops answering for a name that is no longer on the
roster — but her hash stays in .env.auth. Add the name back months later and
her old password works again. decommission (or prune, for names already
edited out) is what actually retires the credential.
A plaintext password in .env survives decommission. If you seeded
alice’s password by putting OSPREY_AUTH_PW_ALICE in the project’s .env,
decommissioning her clears the hash but leaves that line — and the next
osprey up for a new alice hashes it straight back in, handing the new
person the departed one’s password. The decommission warns you, but the warning
scrolls past in a deploy log weeks before anyone reuses the name. Delete the
.env line by hand when the person leaves.
In OIDC mode, decommission is the verb that ends a session.
prune cleans up users already off the roster, but it only restarts the
authentication service when it actually removed a password entry — and an OIDC
user has none. Their container is gone either way, so the stale route just
fails; but if what you need is that person’s session closed now, run
decommission.
To turn login back off, set auth.method: none and run osprey up.
That re-renders nginx and the compose file, drops the authentication service,
and returns the stack to the open posture described at the top of this section.
.env.auth is left in place, so turning login on again keeps everyone’s
existing password.